

How Long Do You Cook Mini Tarts
Jump to Recipe
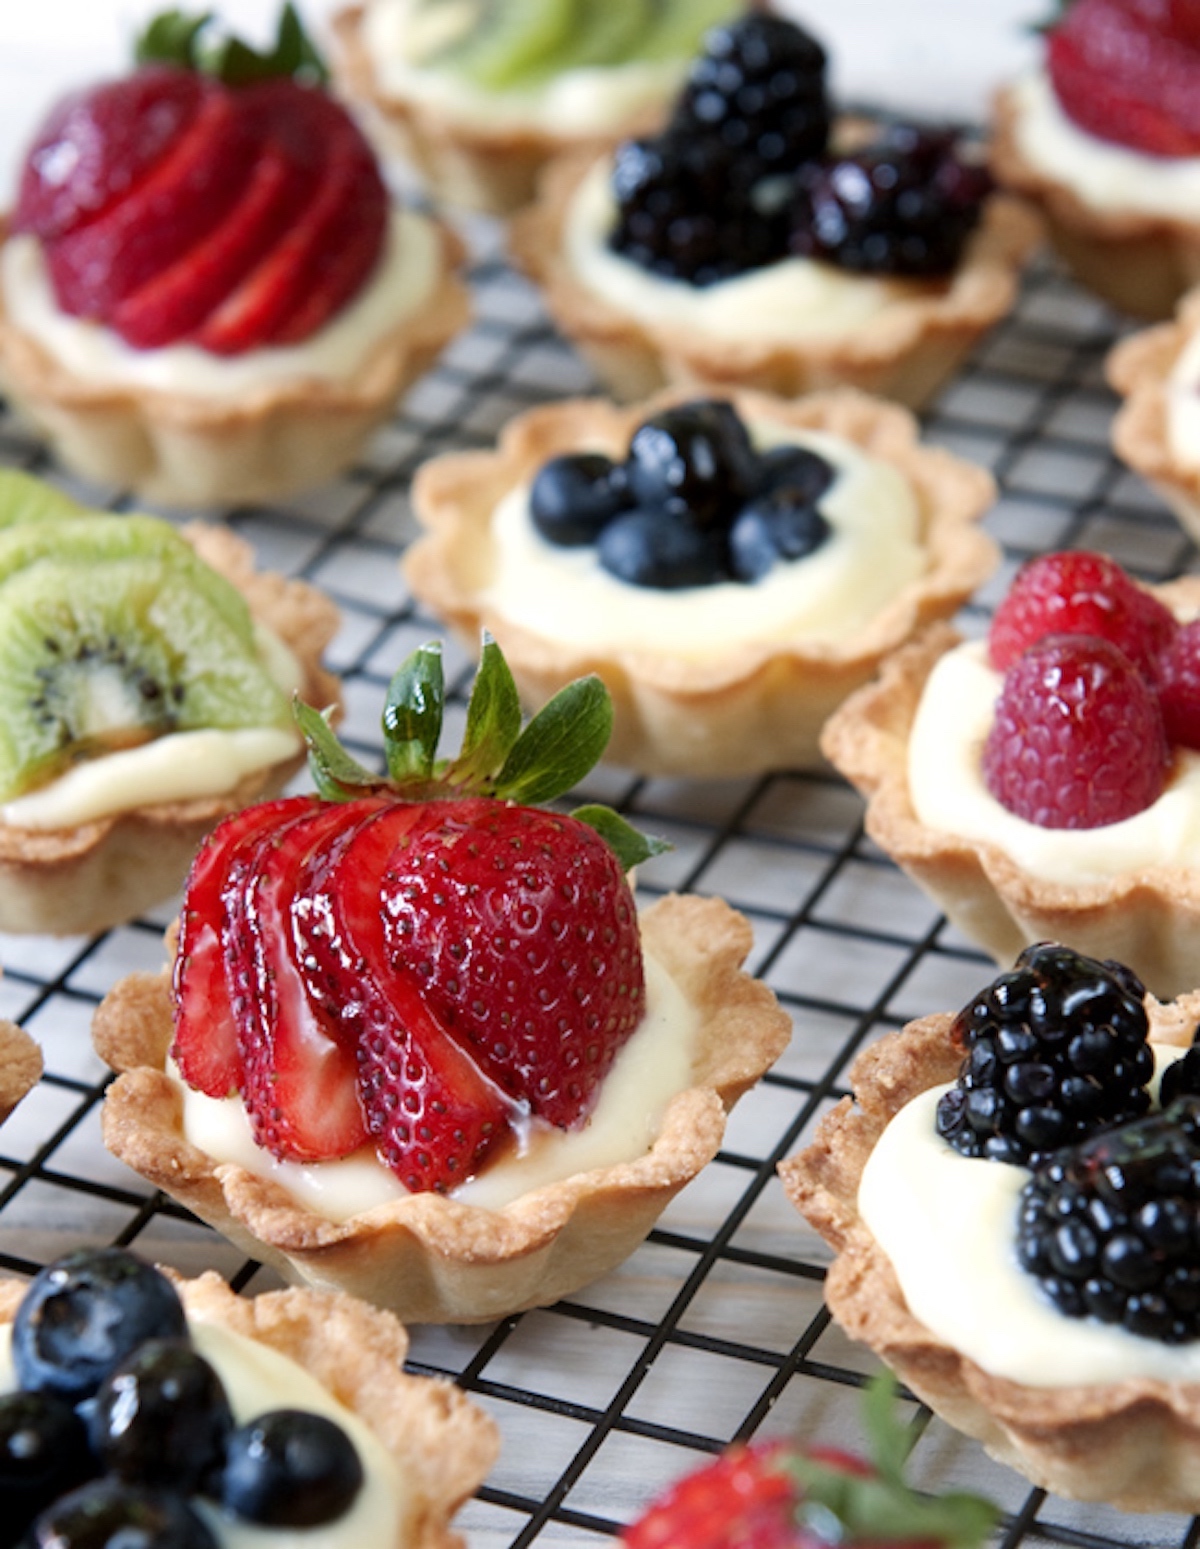
Sneak Preview: The mini fruit tarts in this recipe are filled with vanilla pastry cream inside a homemade shortbread crust and topped with fresh fruit. Perfect for a crowd.
Why are mini fruit tarts an outstanding choice to serve a crowd?
- Mini-tarts are pre-portioned. Avoid the hazards of slicing a pie with a crumbly or tough crust, a runny or frozen filling, or customizing the serving size.
- Small enough to eat out of hand–forks not required
- Choose fruit according to what's least expensive.
- Not too much crust, not too much filling. The ratio is ju-u-u-ust right.
- Make the crusts ahead of time.
The shortbread crusts are so fresh and tasty when they are homemade. The pastry cream comes together quickly in a microwave. Top each tart with the fresh fruit of your choice. Add sparkle with a touch of glaze (currant jelly).
Don't miss the tip at the end for an easy way to freeze the egg whites leftover from making the vanilla pastry cream.
Is this recipe easy enough for beginners?
The filling is easy enough for anybody who can operate a blender and a microwave. But, if you haven't tried making pudding or pie filling with a microwave yet, you don't know what you're missing.
Note: If you don't have or want to use a blender, use a whisk and a bowl. Combine all the ingredients and give them a whippin'. If your final product has any lumps, run it through a sieve.
Making the cream pastry is so easy with a microwave!
Here's why?
- No worries about scorching the milk or letting it boil over
- No tempering the eggs
- No lumps if you use a blender and whisk according to the directions
- No double boiler needed (thank goodness since I gave mine away years ago)
Related Post: Easy Mini Lemon Tarts with a Shortbread Crust
About the crust…
These mini-crusts are somewhat tedious and may be challenging for people who have never made a pie crust. However, store-bought, pre-baked mini crusts are readily available if you are a novice baker or trying to make these in quantity.
By way of encouragement:
You can make the crusts ahead of time. The raw dough pressed into the molds can be kept in the freezer for over a month. Planning will give you plenty of time to practice and build your confidence.
Why won't the pastry cream get thick?
If you have cooked the pastry cream according to the directions and it is still not thick, keep cooking.
Remember, microwaves vary wildly in how fast they cook. Differences in the starting temperature of your ingredients are another variable.
It may take less time than I have suggested if you have a relatively new and powerful microwave. On the other hand, it may take even longer than the recipe states if you have a smaller or less powerful microwave oven.
Your pastry cream mixture will get thick if you cook it long enough and follow the recipe precisely.
Related Post: Mini Strawberry Tarts: Simple to Serve, Easy To Eat
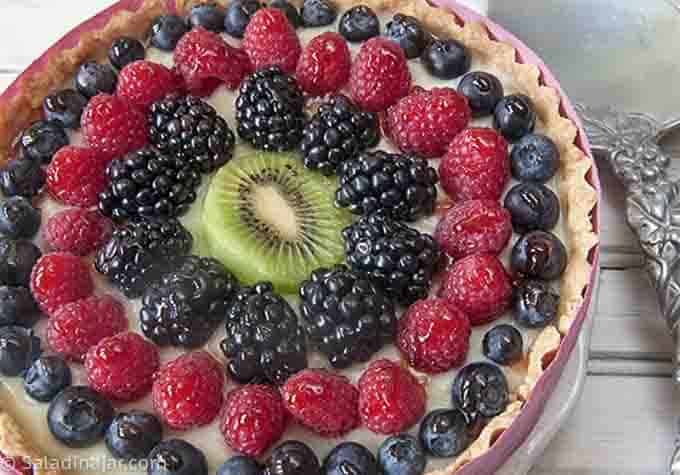
What fruit is best for fruit tartlets?
Small strawberries, blackberries, blueberries, raspberries, and kiwi are my favorite. The fresher and sweeter they are, the better. Stay away from watery fruits like melons.
How can I keep the fruit on top of the tart fresh as long as possible?
Don't wash fresh fruit under running water. Instead, wipe the fruit off with a damp paper towel or cloth. Dry fruit will help the glaze adhere and keep the fruit looking lovely longer.
Can I make these mini fruit tarts ahead of time?
Crusts: If more convenient, make the tart shells 1-2 months ahead of time and store them in the freezer. Freeze individually shaped tart shells (unbaked)or the entire rolls of dough. Prepared crusts, whether frozen or not, can be baked the day before.
Filling: Make the custard at least 3 hours ahead so it can firm up as it cools. If you make the cream pastry a day earlier, give it a good whip before pouring it into the shells.
Putting tarts together: Assemble the mini pies the day you want to serve them. If you do it the day before, the crusts will absorb moisture from the custard and lose their crispness.
Add the fruit as you're getting ready to serve them. The fruit will eventually leak juices that will affect their appearance.
4 secrets for making miniature shortbread crusts:
#1
Grease and flour your molds generously.
If you use silicone molds like the ones shown in this post, you won't have to worry about this. Otherwise, Baker's Secret is perfect for the job. Another option is homemade pan release or GOOP.
#2
Freezing the raw tart crusts is ABSOLUTELY ESSENTIAL.
Otherwise, the tart shells will shrink and melt the minute they hit the oven.
#3
Place foil inside crusts before baking.
Press the tiny squares of foil down against the crust. The foil will keep crusts from rising in the middle while they bake. No other weight is necessary. If you have trouble with the foil sticking, use non-stick aluminum foil.
Save the used foil if you want to. It's reusable with your next batch of crusts.
#4
Turn the crusts out of the pan within 3-4 minutes after coming out of the oven.
Do it quickly but gently. These are a bit fragile when warm. On the other hand, these shortbread crusts taste like shortbread, so the broken ones make great eating by themselves. (The crusts NEVER stick to the silicone molds. I can't recommend them enough.)
Related Post: Mascarpone Cheesecake Mini-Tarts–Easy To Customize
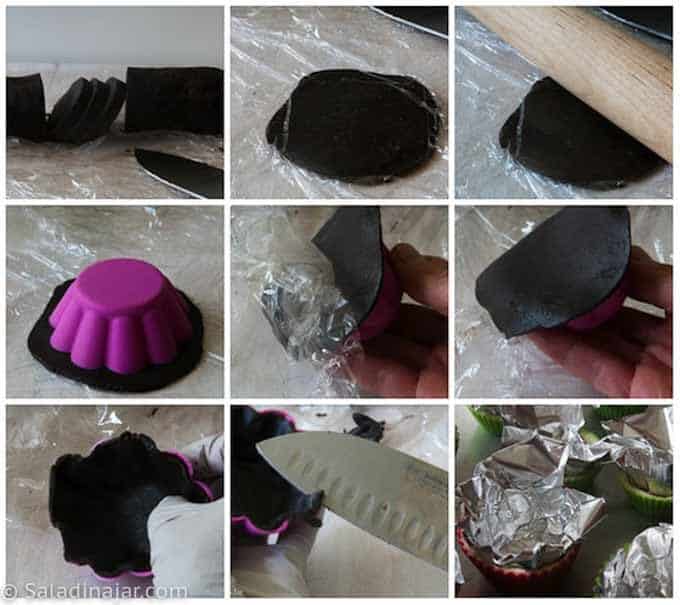
How to make mini-tart crusts:
This picture from my post about Chocolate Ganache Mini-Tarts illustrates the process of making the tart crusts. Don't miss the video on this post.
How to make vanilla pastry cream in a microwave:

Step #1: Pour the milk, sugar, cornstarch, salt, and egg yolks into a blender. Blend 5 seconds.
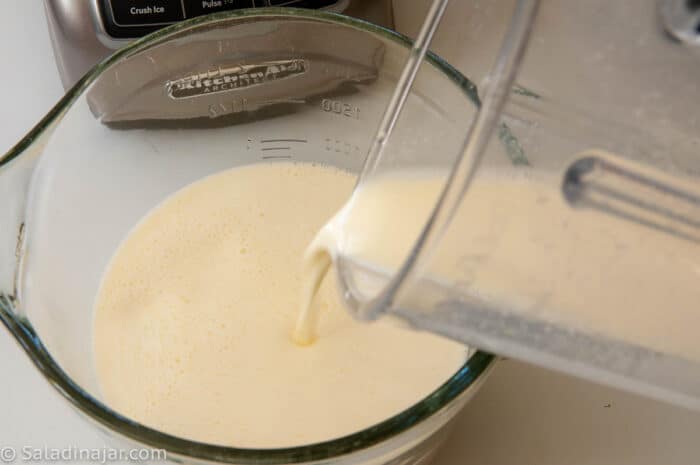
Step #2: Pour the filling into a 2-quart microwave-safe Pyrex bowl or pitcher.
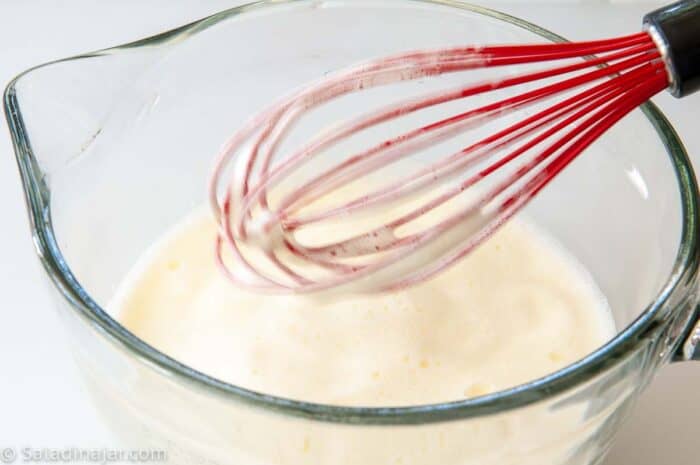
Step #3: Microwave on HIGH for 6-8 minutes, stopping halfway to stir and again after every minute.
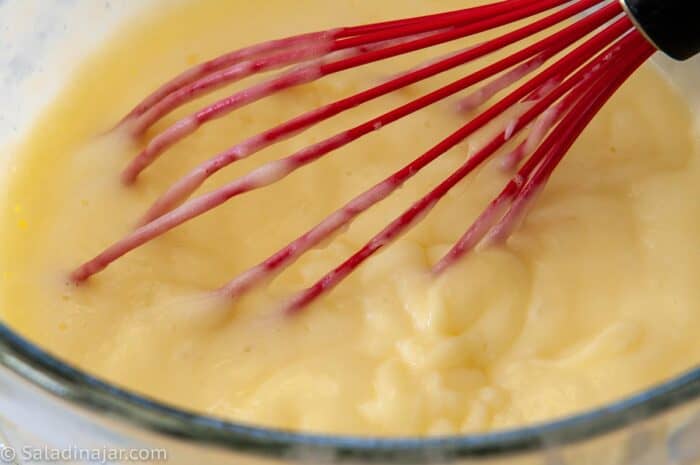
Keep microwaving until your cream starts to thicken like the picture above.
Step #4: Whisk butter and vanilla extract into the cream filling until smooth.
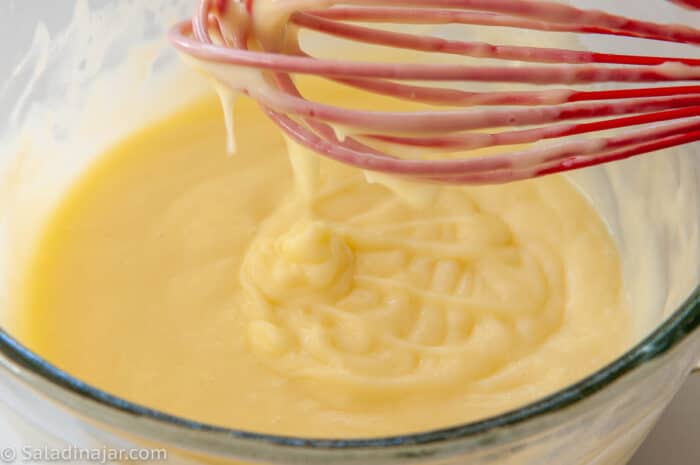
As the pastry cream cools, it will get thicker, but it won't get firm until the mixture is thoroughly chilled.

Step #5: Fill tart shells with warm pastry cream. If you're not ready to assemble the tarts yet, cover them with plastic wrap. Press the wrap next to the surface of the cooked filling so it won't form a skin over the top.
Kitchen tip: How to freeze leftover egg whites:
Since you only need egg yolks to make the cream filling, I like to freeze the whites. The silicone molds I recommend for these tarts are the perfect container for one egg white.
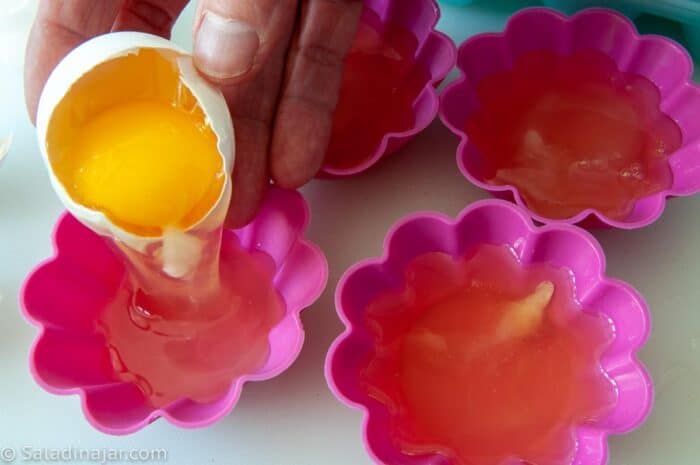
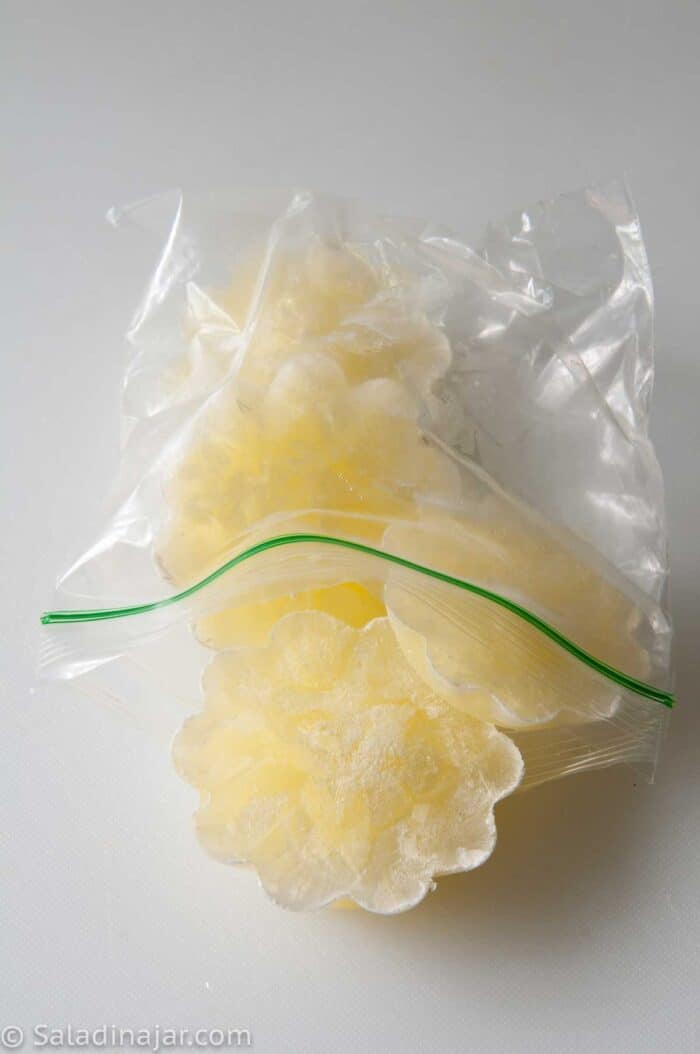
As soon as the egg whites freeze solid, you can peel the silicone away from the egg white. Then, collect them in a zippered plastic bag and stash them in the freezer. When you accumulate enough egg whites, try these Spicy Pecans, Coffee Angel Food Cake, or this Chocolate and Vanilla Angel Food Cake.
More recipes for pie lovers:
Chocolate Ganache Mini-Tarts
Chocolate Ganache Mini-Tarts are either chocolate or vanilla crust mini-tarts, filled with a decadent but easy bittersweet chocolate ganache.
Pumpkin Pie Mini Tarts
These Pumpkin Pie Mini-Tarts are easy to carry to Grandma's house or put them on your dessert buffet. The small size makes them easy to grab and eat.
Mini Lemon Tarts
These Easy Mini Lemon Tarts are made with lemon curd and homemade créme fraîche. Pile the filling into homemade shortbread crusts and decorate with fruit. It's a little bit rich but the perfect size for satisfying an after-dinner sweet tooth.
Zebra Cream Pie
A layered chocolate and vanilla cream pie nestled in a dark chocolate Oreo cookie crust. Cream filling cooked in the microwave.
Prep Time 45 minutes
Cook Time 45 minutes
Total Time 1 hour 30 minutes
Ingredients
Mini-Tart Crust:
- 1-1/2 cups unbleached flour
- 1/3 cup powdered sugar
- 1/4 teaspoon salt
- 1/2 cup butter (1 stick), chilled
- 1 egg yolk (from a large egg)
- 1 tablespoon heavy cream
Cream Filling:
- 2-3/4 cups milk
- 2/3 cup sugar
- 1/4 cup cornstarch
- 1/8 teaspoon salt
- 4 egg yolks
- 2 tablespoons butter
- 1 teaspoon vanilla extract
Glaze
- 1/4 cup currant jelly
Instructions
Crust:
- Combine flour, sugar, and salt in a food processor.
- Cut butter into 8 slices and add to flour, pulsing several times until mixture resembles oatmeal. Add egg yolk mixed with cream.
- Pulse until all ingredients are moistened. Then allow the machine to run a few seconds until the dough starts to stick together. (Add additional drops of cream if the dough seems too dry.)
- Press dough into a roll like refrigerated cookie dough. Wrap in plastic and chill 30 minutes.
- Spray molds generously with Baker's Secret or something like it. (Baker's Secret is an aerosol spray mix of flour and oil.) If using silicone molds, no greasing is necessary.
- Slice your roll of dough into 12 pieces. Using a rolling pin, roll the dough between two pieces of plastic wrap into a circle slightly larger than tart molds. Press into a mold with fingers being careful to keep the thickness consistent. Use a knife to trim off any extra at the top. Freeze for at least 30 minutes, overnight or up to a month. (See video for this step.)
- Place frozen tart shells on a cookie sheet. Press a small square of foil down into each crust and mold it to the shape of the crust. See the picture above.
- Bake at 400 degrees for 10 minutes. Remove foil and continue to bake until golden brown, usually about 3-4 minutes.
Cream Filling:
- Add milk, sugar, cornstarch, salt, and egg yolks, to a blender or food processor bowl. (You can use a bowl and a whisk if that's all you have.)
- Blend 5 seconds and pour into a 2-quart glass microwave-safe bowl.
- Microwave 6-7 minutes on HIGH, whisking until smooth after 3 minutes, then every minute thereafter. (Keep microwaving if not thick after 7 minutes.)
- Add butter and vanilla and whisk until smooth.
- If not ready to assemble, cover the top of the warm custard with plastic wrap and smooth it to touch the surface. This prevents a skin from forming on top of the cream.
Assembly:
- Fill each baked tart shells with cream filling. Top with fruit of your choice.
Glaze:
- Melt 1/4 cup currant jelly and use a brush to dab some shininess on each piece of fruit. It's OK if some drips onto the cream.
Notes
NOTES
1. If dough in the food processor seems too dry to press into a ball, add a teaspoon or two of milk or cream.
2. Tarts are best eaten the day they are assembled.
3. A dollop of whip cream makes these even better.
Nutrition Information:
Yield:
14 Serving Size:
1 tart
Amount Per Serving: Calories: 266 Total Fat: 13g Saturated Fat: 8g Trans Fat: 0g Unsaturated Fat: 4g Cholesterol: 98mg Sodium: 170mg Carbohydrates: 32g Fiber: 1g Sugar: 17g Protein: 6g
How Long Do You Cook Mini Tarts
Source: https://saladinajar.com/recipes/desserts/pies/fruit-and-cream-mini-tarts/
Posted by: stephensonfriter54.blogspot.com
0 Response to "How Long Do You Cook Mini Tarts"
Post a Comment